NOTE: iPad users go here. All Windows, Mac, and Chromebook users can proceed to the next section.
First Steps (Windows/Mac/Chromebook)
- Verify playback
- If you are using headphones, unplug them.
- Raise the volume of your speakers.
- Navigate to https://www.onlinemictest.com/sound-test/
- Click the triangular Play icons to test sound in both your left and right speakers.
- If you hear sound from both speakers, proceed to step 2.
- If you do not hear sound:
- Restart your device and repeat these steps.
- If you still aren't hearing any sound, either contact your device manufacturer or a local computer technician.
- Close your browser
- Relaunch your browser
- Reopen your browser and log in to MakeMusic Cloud.
- Open your assignment.
- The Media Settings icon
appears at the far right of your address bar. Select that icon to quickly open your Chrome microphone settings.
- Make sure to have "Continue allowing https://asmnext.makemusic.com to access your microphone" selected. Use the Microphone drop-down menu to choose which mic you want. Click Done.
- Click the red Record button
.
- Under Select Assessment Type, choose either Melodic or Percussive, and click Select this mode and device.
- Click Test your microphone. MakeMusic Cloud plays a short, sweeping test tone from your speakers to calibrate your microphone.
- When you see the message "Success - You are ready to perform!", plug in your headphones and click Start to begin recording.
- Wait for the countoff to complete and begin playing.
- After the recording has finished, click the purple play icon
to listen back to your take and confirm that you can hear your performance.
- If you are still unable to record successfully, choose your device below for next steps:
- Windows Microphone Troubleshooting
- Mac Microphone Troubleshooting
- Chromebook Troubleshooting
- iPad Troubleshooting
Windows Microphone Troubleshooting
First, ensure your mic isn't muted. To check if your microphone is muted on Windows, go to Settings > System > Sound, select your microphone in the Input section, and speak into it to see if the blue volume bar moves. If the bar moves, the microphone is not muted. If you don't see movement, you can click Test your microphone to run a more detailed test.
Next, ensure that you are using Google Chrome, check that it is up to date, and clear the cache.
Update Google Chrome
- On your computer, open Chrome.
- At the top right, click
.
- Click Update Google Chrome (*If you don't see this button, you're on the latest version).
- Click Relaunch.
Clear the Cache
- On your computer, open Chrome.
- At the top right, click
.
- Click More tools
Clear browsing data.
- Choose a time range, like Last hour or All time.
- Select cached data.
- Click Clear data.
Before proceeding with the next steps, check to see if your microphone is now functioning correctly by reopening the piece in MakeMusic Cloud and trying to record a take. If it is still not working, continue with the following instructions.
Now, let's confirm your OS microphone privacy settings are not blocking access to your microphone:
- Press the Windows key
on your keyboard to open the Start menu.
- Type "privacy" and press ENTER to open the Privacy Settings panel.
- Choose Microphone from the left-hand menu.
- Locate the setting for Allow apps to access your microphone.
- Make sure that this is set to On.
Next, let’s confirm the Google Chrome browser is able to access your microphone, too:
- Open Chrome.
- At the top right select More
> Settings.
- Under Privacy and security select Site settings.
- Click Microphone and turn on Sites can ask to use your microphone.
Before proceeding with the last step, check again to see if your microphone is now functioning correctly by reopening the piece in MakeMusic Cloud and trying to record a take. If it is still not working, continue by testing your microphone outside of MakeMusic Cloud:
- In Chrome, navigate to www.onlinemictest.com.
- Follow the instructions on this website to test your microphone.
- Does the “Test” line move when you talk?
If you've tried each of these potential solutions and you're still encountering the same error, submit a support claim to Customer Support. Make sure you include your device model and OS, plus the results of your online microphone test.
If Mic Performance Seems Inconsistent - Disable Audio Enhancements
If you're finding that the mic test works inconsistently or the assessment doesn't seem to be hearing your performance accurately, the Windows Audio Enhancements can negatively impact the microphone performance and cause unpredictable behavior. For best results, please make sure that this feature is disabled.
-
Choose Start > Settings > System > Sound > Select your microphone from the dropdown under Input
-
Locate "Audio enhancements" and choose "Off" from the dropdown menu
Mac Microphone Troubleshooting
First, ensure your mic isn't muted. To check if your Mac's mic is muted, go to the Apple menu > System Settings (or System Preferences) > Sound > Input to open the sound input settings. Select your desired microphone, and if the Mute checkbox is ticked, uncheck it. You can also test by dragging the Input Volume slider, and the Input Level indicator will move if sound is being detected by the mic.
Next, ensure that you are using Google Chrome, check that it is up to date, and clear the cache.
Update Google Chrome
- On your computer, open Chrome.
- At the top right, click
.
- Click Update Google Chrome (*If you don't see this button, you're on the latest version.)
- Click Relaunch.
Clear the Cache
- On your computer, open Chrome.
- At the top right, click
.
- Click More tools
Clear browsing data.
- Choose a time range, like Last hour or All time.
- Select cached data.
- Click Clear data
Before proceeding with the next steps, check to see if your microphone is now functioning correctly by reopening the piece in MakeMusic Cloud and trying to record a take. If it is still not working, continue with the following instructions.
Now, let's confirm your OS microphone privacy settings are not blocking access to your microphone:
-
Select the Apple menu
> System Settings (or System Preferences)
-
Select Privacy & Security (or Security & Privacy).
- For users running macOS 12 Monterey and earlier, navigate to the Privacy tab of this page.
-
Select Microphone.
- For users running macOS 12 Monterey and earlier, click the Lock icon in the bottom left-hand corner and type in your computer's password to make changes.
-
Allow Google Chrome access to your microphone.
Next, let’s confirm the Google Chrome browser is able to access your microphone, too:
- Open Chrome.
- At the top right select More
> Settings.
- Under Privacy and security select Site settings.
- Click Microphone and turn on Sites can ask to use your microphone.
Before proceeding with the last step, check again to see if your microphone is now functioning correctly by reopening the piece in MakeMusic Cloud and trying to record a take. If it is still not working, continue by testing your microphone outside of MakeMusic Cloud:
- In Chrome, navigate to www.onlinemictest.com.
- Follow the instructions on this website to test your microphone.
- Does the test line move when you talk?
If you've tried each of these potential solutions and you're still encountering the same error, submit a support claim to Customer Support. Make sure you include your device model and OS, plus the results of your online microphone test.
Chromebook Troubleshooting
First, ensure your microphone is unmuted.
-
- At the bottom right, select the time.
- Next to the volume slider, select Audio settings
.
- Under “Input,” verify the microphone is not grayed out and its volume slider is up.
Next, ensure that your ChromeOS is up to date. For more information, click the following link:
Next, troubleshoot your microphone by proceeding to this link:
iPad Microphone Troubleshooting
When using an iPad to access MakeMusic Cloud in Safari, you need to calibrate the microphone in order to record practice takes and assignment submissions.
In the event that the microphone isn’t recognized when trying to calibrate or record, there are several ways to troubleshoot the issue.
First Steps
Before troubleshooting your microphone access, investigate the following primary considerations.
- Ensure that your iPadOS and iPad model meet the current system requirements.
- Read about setting up to record here.
- Take special note to use headphones when recording, as the microphone and speakers on an iPad are directly next to each other. Do not use headphones that have an internal microphone.
Allowing Safari to Access Your Microphone
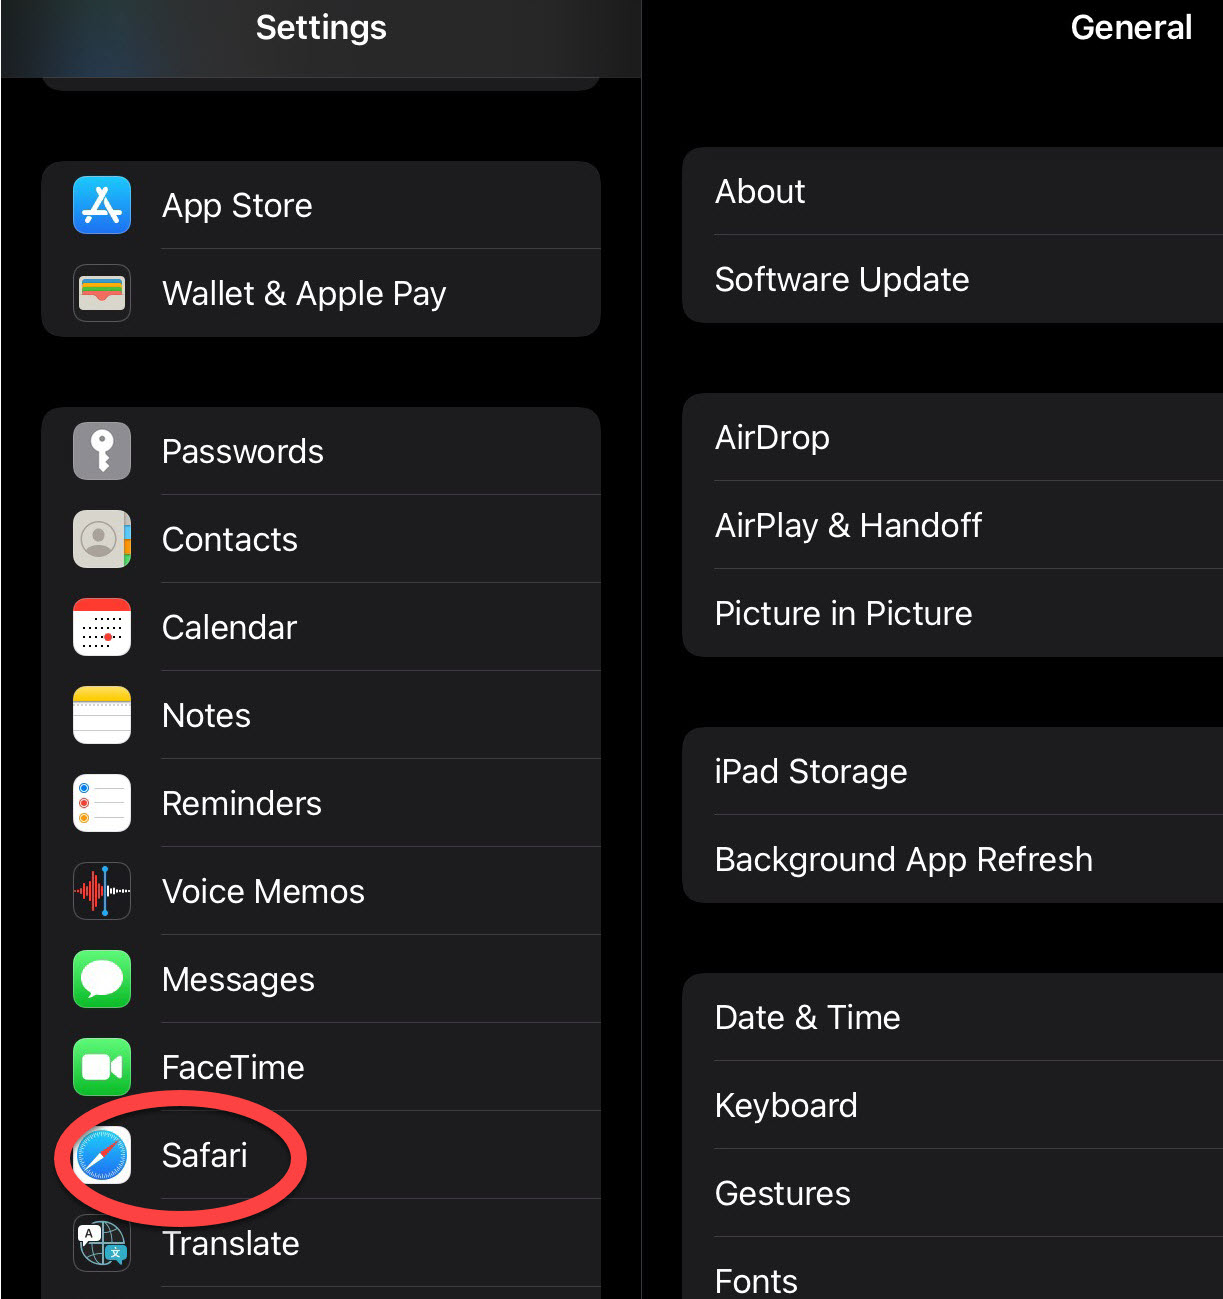
- On your iPad, tap on the Settings icon.
- Scroll down and select Safari.
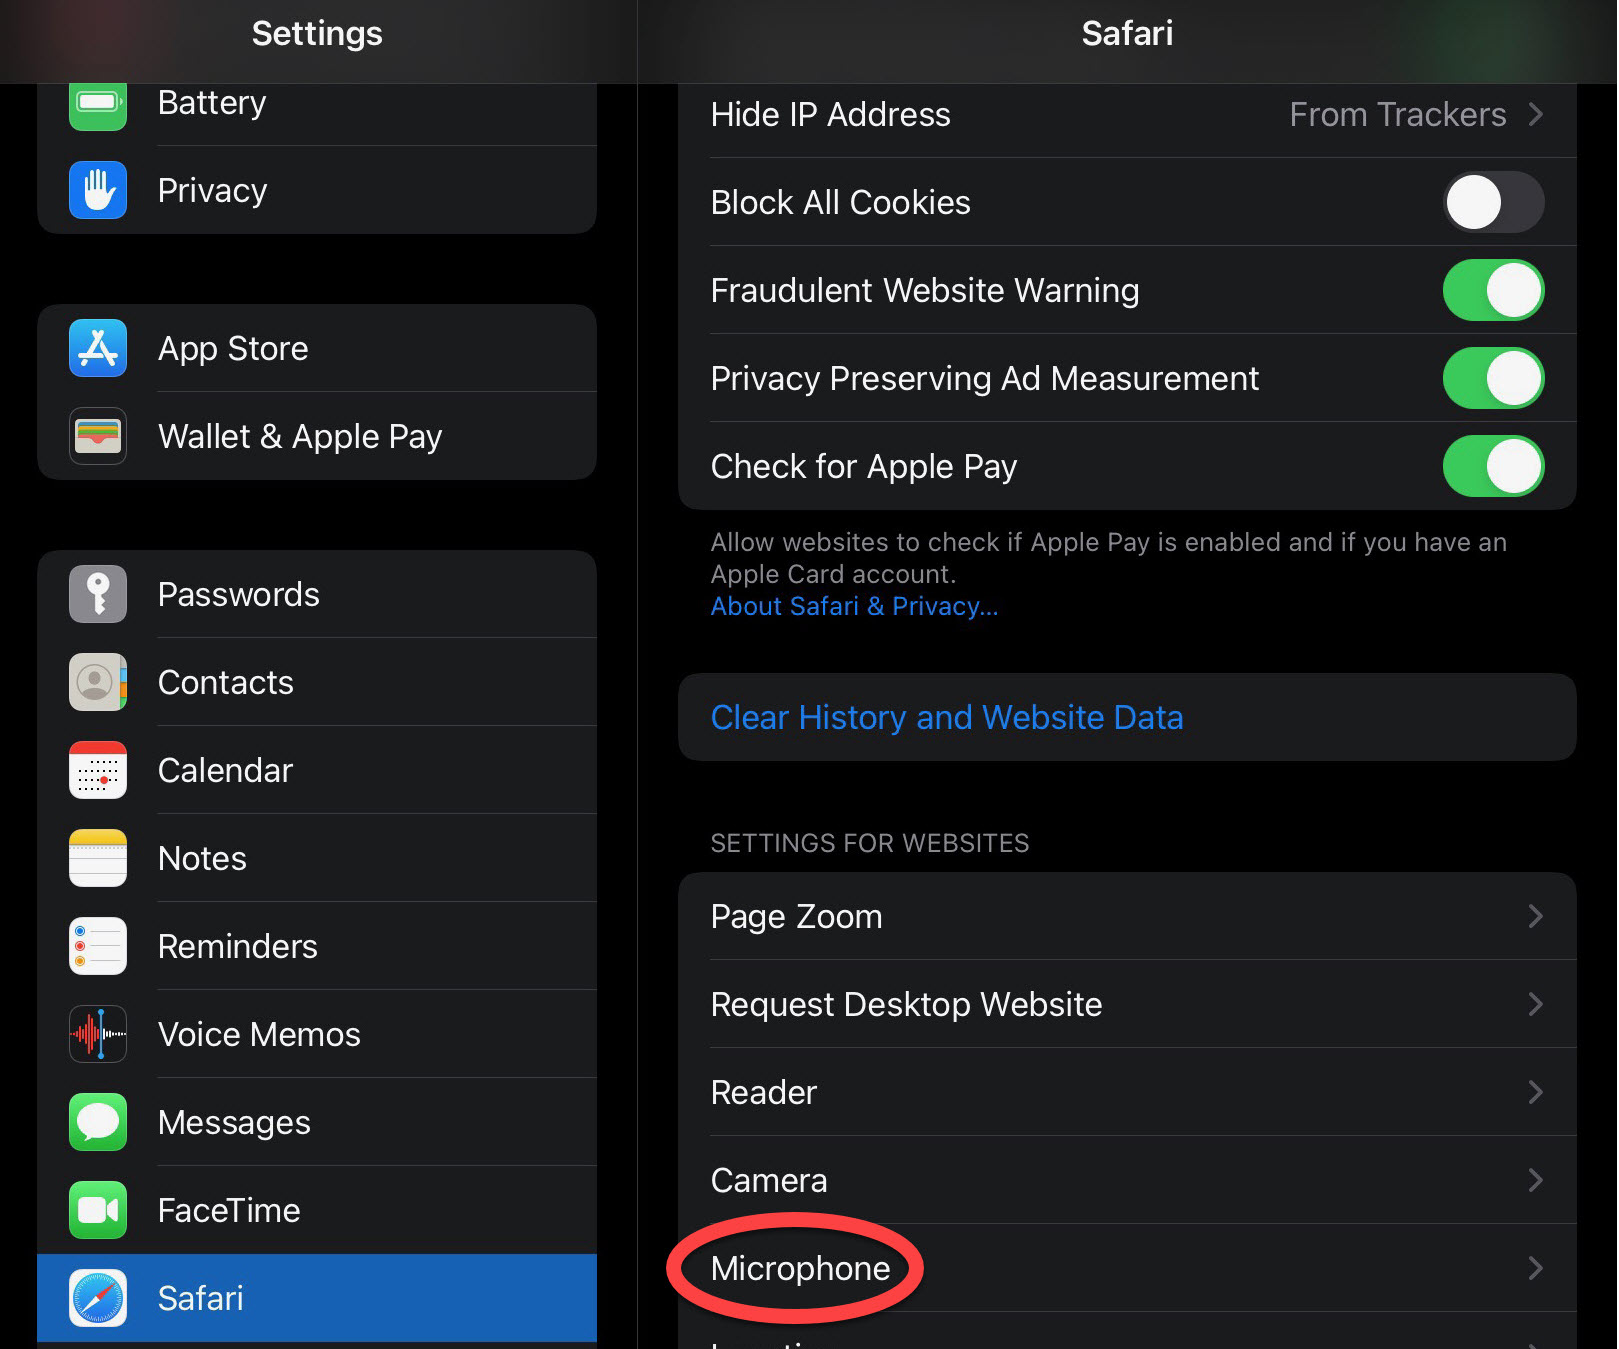
- Select Microphone.
- Set to Allow. A check mark now appears next to Allow.
- Return to Safari, refresh the page, and try recording again.


Clear Safari’s Browsing History
If the previous steps weren’t effective, it can also be helpful to clear Safari’s browsing history.
- On your iPad, tap on the Settings icon.
- Scroll down and select Safari.
- Tap Clear History and Website Data.
- Return to Safari, refresh the page, and try recording again.
Close All Open Applications
Finally, closing all open applications can also help in certain situations where all of the fixes above haven’t yet resolved the problem.
- Open the App Switcher.
- Swipe up from the bottom edge and pause in the center of the screen.
- Quickly double press the home button (for an iPad with a home button).
- Swipe up on an application to close it.
- Once you’ve closed all of the open applications, you’ll return to the home screen.
- Return to Safari, refresh the page, and try recording again.
If you've tried each of these potential solutions and you're still encountering the same error, submit a support claim to Customer Support. Make sure you include your iPad model and iPadOS version (click on each link if you need instructions on how to find that information).

0 Comments